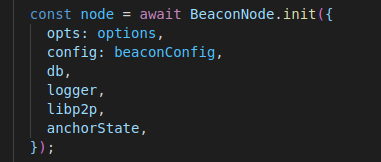
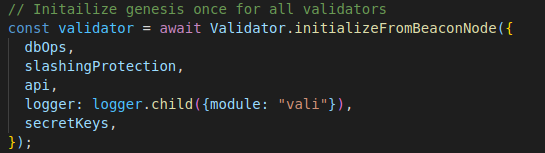
So what exactly is Lodestar? As the name implies, it is the star that guides our path towards a greener and scalable future of Ethereum. But more specifically, Lodestar is an open source implementation of the Ethereum consensus client, more commonly known as eth2, developed by ChainSafe Systems in a language loved and understood by many: TypeScript. This article focuses on how a developer could easily spin up a local development chain for testing and experimental purposes without needing the time required to sync with a test net or mainnet. If you’re looking for a guide to setup Lodestar for a public testnet or mainnet, you can follow this helpful guide. This article is geared towards developers with an intermediate understanding of JavaScript/TypeScript and with a passion towards understanding how the core protocol layer of the Ethereum blockchain operates. The essence of blockchain, specially the Ethereum ecosystem, is decentralization of all kinds of knowledge and power, which can only be achieved if more people understand and test out the code that will be securing Ethereum in the very near future. So without further ado, let’s dive into how you, as a TypeScript developer, could go about understanding, testing and maybe even contributing to the Lodestar codebase. There are multiple ways to install Lodestar to run it but I would recommend building it from source. Clone the repository and build from source. To confirm everything has gone according to plan: This will print out the list of commands that work with the dev command. If you run the following command, a beacon node is set up for a local blockchain, alongwith 8 validators. That’s it. The time taken to spin up a local blockchain is only dependent on the time required to build the code. No need to wait for syncing. Lodestar follows a monorepo structure where the packages directory consists of the different modules within Lodestar. To actually understand how all these moving parts come together, a good entry code is this file It includes setting configuration variables according to the arguments being sent or the default values for which the arguments haven’t been specified. Finally, the node is initialized in the following code snippet. In short, this function starts the local database for the node, sets up everything required for the p2p network, metrics etc. To understand how exactly a node is initialized, the best way is by going through the code of the init function inside the file linked After doing the main task of setting the node with the appropriate configurations, it’s time to finally initialize the second major component of the client: the validator. The validator connects to the beacon node using the api argument. After the validator is properly initialized, it is started which means that the validator client starts its main duties: proposing blocks and signing attestations. Again, for greater understanding, I would highly recommend going through the initializeFromBeaconNode() function in the file linked to follow how a validator is set up To start off the code might look a little overwhelming. A codebase which is 3+ years old and is implementing one of the most comprehensive protocols, involving databases, networking, cryptography and many more, will obviously have some sort of a learning curve. But the good news is that it’s not impossible. My first recommendation would be to run a debugger. If you’re using Visual Studio Code and have never debugged before, this should help you out. Be as liberal as you want with your breakpoints. Check the state of local and global variables at different stages of execution, print out the variables you’re not sure about, manipulate the state of the variables to test out any ideas you have, etc. What will really strengthen your concepts is making a small modification to the code. Here, you can use your own creativity or you can pick up an open issue from Lodestar’s github. It’s an open source project, open to contributions from anyone and everyone, with a team of developers who are welcoming to people looking to contribute. Jump in to ChainSafe’s Discord and ask any question you have or any problem you’re facing regarding the project, and you’ll likely receive an encouraging response. And finally, stay tuned to further updates from our side. We have already shared an article regarding how we went about making our first open-source contribution at Novon Labs. It talks about our journey during the process, what kind of issues we faced, and how we overcame those issues to make a small yet meaningful contribution to the star that is going to be guiding the course of Ethereum’s future. Introduction
Why would you want to do this?
Setup
git clone https://github.com/chainsafe/lodestar.git
cd lodestar
yarn install
yarn run build
./lodest./lodestar dev --genesisValidators 8 --reset ar dev --help
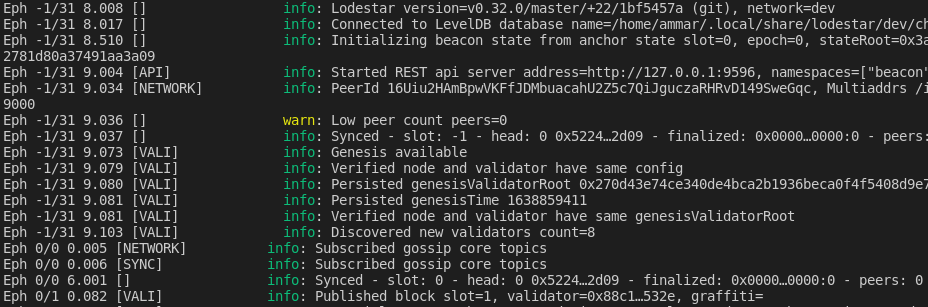
./lodestar dev --genesisValidators 8 --reset
Exploring the code flow
Breaking it all down
Conclusion
Resources

We develop cutting-edge products for the Web3 ecosystem supported by our extensive research on blockchain core and infrastructure.

